If you grow tomatoes and you haven’t tried the Florida weave trellis yet, let me tell you — this technique is a game changer. I’ve tried cages, I’ve tried individual stakes with twist ties, I’ve tried letting plants do whatever they want (spoiler: they don’t behave), and nothing has worked as well for my indeterminate tomatoes as the Florida weave.
I put together this quick video to show you exactly how I do it out in the gar-deen, because sometimes seeing it in real time is worth more than a thousand words of explanation. But I’ll walk you through it here too.
What Is the Florida Weave?
The Florida weave — sometimes called the basket weave — is a staking method used by commercial tomato growers throughout Florida and the Southeast. It’s designed for efficiency: instead of caging or tying each individual plant, you run twine in a weave pattern down a whole row of plants at once, supporting them all on both sides.
It’s simple, inexpensive, and incredibly effective. All you need are wooden stakes (or metal T-posts) and biodegradable jute twine or poly twine.
How to Do the Florida Weave Trellis on Tomato Plants — Step by Step
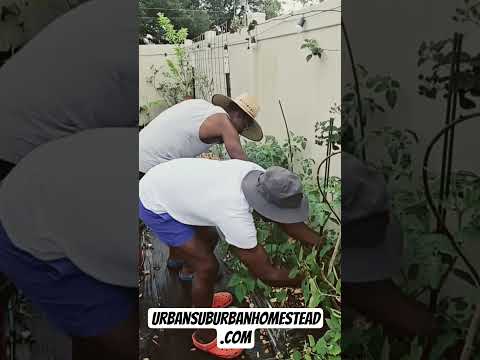
Step 1: Drive your stakes. Place a stake at each end of the row, and then one stake between every one or two plants. The stakes need to be deep enough to be solid — at least 12 inches in the ground — because they’ll be holding up a lot of weight as the season goes on.
Step 2: Start your first layer of twine. Tie your twine to the first end stake at about 8–10 inches above the soil. Walk down one side of the row, keeping the twine taut against the front of each plant’s stem as you go. Loop the twine around each stake as you pass it to lock the height in place.
Step 3: Come back down the other side. When you reach the far end stake, loop the twine around it and come back down the opposite side of the row. The plants are now sandwiched between two runs of twine — supported on both sides. Tie off and cut.
Step 4: Add more layers as the plants grow. Every time your tomato plants grow another 8–10 inches, add another layer of twine above the previous one. Indeterminate tomatoes can get very tall, so you may add 4, 5, or even more layers throughout the season. For a full look at how we set up our tomato beds from planting day forward, check out our Trellising & Garden Structure guides.
Why I Love This Method
The thing I appreciate most about the Florida weave is how much it respects the plant’s natural growth pattern. You’re not forcing the stem into an awkward cage or wrestling with individual ties — you’re just gently guiding the plant upright as it grows.
The other thing I love is airflow. With the plants held upright in a row rather than flopping over each other, air moves through freely. In Florida’s humidity, that makes a real difference in keeping foliar disease at bay. Less powdery mildew, less early blight pressure — it’s all connected.
And when harvest time comes? Walking along a neat, organized row of upright tomato plants and picking fruit is an absolute pleasure compared to hunting through a collapsed cage situation.
A Few Things to Watch Out For
Stake depth matters. Shallow stakes will lean and eventually fall as the vines get heavy and wind pushes against them. Drive them deep from the start.
Keep the twine taut. Loose twine doesn’t actually support anything. Each time you add a layer, pull the twine firm before tying off.
Don’t wait too long between layers. If your tomatoes shoot up 18 inches before you add the next layer of twine, those top stems are flopping around unsupported and can break. Check on them regularly and add twine before you think you need to.
Use the right twine. Heavy jute or natural fiber twine works well and is biodegradable for easy cleanup at end of season. If you use something too thin it can cut into the stems under pressure.
The Bottom Line
The Florida weave is one of those techniques that feels almost too simple to work this well — but it absolutely does. If you grow indeterminate tomatoes, I can’t recommend it enough. Give it a try this season and see the difference for yourself. And if you want to see all the other trellis methods we use in the gar-deen — cattle panel, net trellis, and more — head over to our Trellising wit Bae post for the full breakdown.
Watch the video above to see me do it live out in the gar-deen. And if you have questions, drop them in the comments — I’m always happy to talk tomatoes!
Don’t forget to subscribe to the Urban Suburban Homestead YouTube channel so you never miss a gar-deen update. We’re sharing the real journey — what works, what doesn’t, and everything in between.